May 23, 2025
How To Become An Amazon Seller in the USA - Step-by-Step Guide
The continued surge in global eCommerce coupled with upward shifts in consumer purchasing trends means that it’s still not too late to jump on the proverbial bandwagon.
With so many success stories abound, setting up a digital storefront is no longer seen as an excuse to replace a 9-5 but instead a bona fide way of achieving financial success and freedom. So, how do you go about doing business in the online world?
The answer: by becoming a part of the largest eCommerce marketplace on Earth!
Setting up an online store requires an immense amount of time and resources. Once that is complete, you then have to figure out how to manage logistics, marketing, and customer support-related tasks.
For these reasons—and many more—we recommend doing business on Amazon; a platform that ensures its sellers hit the ground running by automating a large chunk of the selling process.
Without further ado, here’s a step-by-step guide on how to become an Amazon Seller in the USA.
Table of Contents
- How Does Being an Amazon Seller in the USA Work?
- How to Be an Amazon Seller in the USA – Where Do You Start?
- How Shopkeeper Can Help You Manage Your Business With Ease
How Does Being an Amazon Seller in the USA Work?
Amazon currently has 16 marketplaces scattered around the world, all of which fall into one of its four major regions:
-
The Americas
-
Europe
-
Asia-Pacific
-
Middle East
Out of all of these marketplaces, Amazon USA is the ideal place to start your seller journey, not least because it’s the ‘original’ marketplace but also due to several factors that make it beginner-friendly.
Amazon.com boasts the highest number of annual sales and is the most advanced marketplace in terms of equipping its users with sophisticated seller tools and analytical reports. The US Seller Central dashboard offers features that are still unavailable in some other Amazon marketplaces, such as the ability to enroll in the FBA Small and Light (more on that here) and the IP accelerator program.
Even though Amazon doesn’t restrict seller operations to a single marketplace, it’s advisable to establish a foothold domestically before expanding into foreign marketplaces.
Now that we know where our starting point lies, let’s take a look at how we can determine our ideal product niche.
Know Thy Niche
Here’s a reassuring fact: 85% of Amazon sellers are profitable. However, the trick is to avoid those product niches where the average seller struggles to make a decent profit. Out of the 36 categories open for third-party sellers, the following ones are optimal for new sellers to do business in:
● Home & Kitchen
● Office Products
● Clothing
● Jewelry
● Pet Supplies
● Health & Personal Care
● Patio, Lawn, and Garden
● Computers
What Business Model Will You Use?
To state that Amazon is a huge marketplace would be an understatement. It accounts for nearly half of the entire US eCommerce retail marketplace. As such, it’s not surprising to know that there are multiple ways of selling on the platform. These include:
● Private Label
● Wholesale
● Retail Arbitrage
● Online Arbitrage
● Dropshipping
● Handmade
Let’s go over each business model to determine which one suits you best.
Selling Method #1: Private Label
Private label is by far the most popular method of selling on Amazon. When opting for this method, third-party sellers purchase products from manufacturers and sell them under a unique brand label. Even Amazon has its own brand called AmazonBasics, through which it sells items sourced from other manufacturers.
Compared to other business models on this list, Private Label is the most expensive but also has the greatest potential for sales and profit.
Selling Method #2: Wholesale
Sellers who decide to do wholesale purchase products in bulk quantities directly from the supplier or manufacturer at discounted rates and then sell them as a reseller at retail prices.
The upside with wholesaling is the opportunity to capitalize on existing demand belonging to an already established brand.
Selling Method #3: Retail Arbitrage
Retail arbitrage is an old-school method of online selling. It involves purchasing goods from physical stores and reselling them online. Sellers also need to keep an eye on the FBA seller fees to ensure a sufficient profit is made per sale.
Selling Method #4: Online Arbitrage
Engaging in online arbitrage involves purchasing discounted or low-priced products from one website and selling them on another. E.g. purchasing towels from eBay and selling them on Amazon. Similar to retail arbitrage, FBA fees play a crucial role in determining the viability of this particular selling method.
Selling Method #5: Dropshipping
When dropshipping on Amazon, the seller acts as a ‘middleman’ whereby they take orders from customers and get the product shipped directly from the manufacturer. The biggest allure of dropshipping lies in its convenience. as there is no need to maintain and store inventory.
Selling Method #6: Handmade
The Handmade niche represents the smallest segment of sellers on Amazon. As the name implies, these sellers create handmade products but are often faced with low and seasonal demand, resulting in inadequate levels of sales and revenue.
The Verdict: Go for Private Label. It’s where sellers make the most money with relatively less amount of risk.
How to Be an Amazon Seller in the USA – Where Do You Start?
Becoming an Amazon Seller in the USA is an easy 2-step process:
-
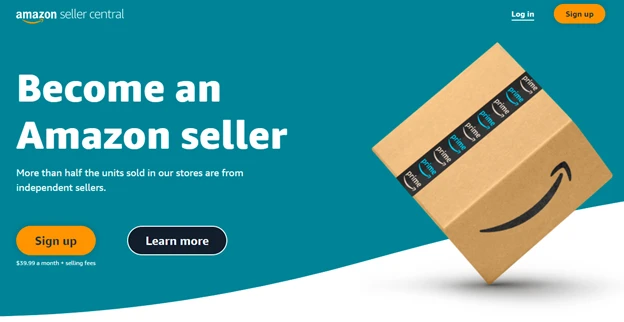
Visit https://sellercentral.amazon.com/ and click on the “Sign Up” button.

-
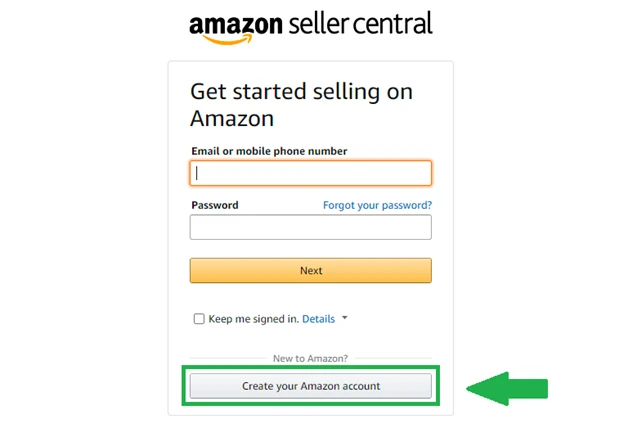
Once that is done, you’ll be redirected to a new webpage like the one shown below. Simply click on the “Create your Amazon account” to begin the account creation process.

Step 1: Apply For a Seller Plan
Irrespective of the marketplace, new sellers have the choice of opting for either the Individual or Professional seller plan. Determining which plan to select depends on your needs. Let’s take a look at what each plan has to offer.
Individual Seller Profile
Signing up for the Individual plan results in a $0.99 fee on every sale you make. This plan is recommended for new sellers wanting to get their feet wet and gain a better understanding of the marketplace dynamics.
It’s also the right plan if you are still uncertain about which product(s) to sell and are expecting less than 40 orders a month.
Professional Seller Profile
The Professional plan costs $39.99/mo. regardless of how many items you sell. Most sellers are subscribed to the Professional plan owing to its benefits such as access to selling reports and compatibility with programs like Handmade and Launchpad.
Note: There is no ‘wrong’ choice here. Amazon lets you switch between plans anytime you want.
Amazon Vendor
Amazon trade vendors function as distributors or suppliers and sell products directly to Amazon. Access to the Vendor Central is granted via invitation only. Despite opening the doors to ample selling opportunities, this program does impose a fair amount of restrictions and is not recommended for new sellers.
Step 2: Create an Amazon Seller Central Account in the USA
To start selling on Amazon, you will need to submit personal and/or business details to complete the registration process. These details include:
● A valid phone number
● Government ID
● Tax Information
● A bank account
● A chargeable credit card
● An Amazon customer account or a business email address
Pro Tip: Seller Central refers to the webpage where sellers can monitor their sales activity. Here, users can add new products, get in touch with seller support, manage inventory, communicate with buyers, and access a range of features and reporting options crucial to running an online business.
Decide Whether You Will Fill Your Own Orders or Use Amazon Fulfillment
After obtaining a Seller Central account, the most important step is to determine which fulfillment method suits you best. A fulfillment method on Amazon refers to how you sell your products to potential customers. This can be done either via FBA (Fulfillment by Amazon) or FBM (Fulfillment by Merchant).
Here’s how both methods work:
Fulfillment by Amazon (FBA): In this method, sellers transport their products to an Amazon warehouse or fulfillment center for storage. Each time the seller receives an order, Amazon ships the product to the customer and also takes care of any customer support-related issues.
Fulfillment by Merchant (FBM): In this method, sellers lists a product on Amazon but then have to handle the storage, shipping, and customer support all by themselves. Some chose to outsource these responsibilities to third-party service providers.
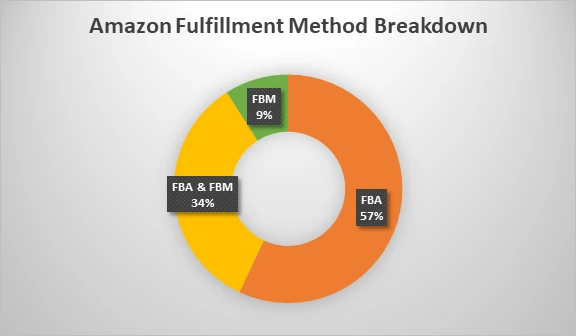
FBA is by far the more popular option. According to one seller report, the breakdown for both fulfillment methods is as follows:

Going by these numbers, FBA would appear to be the more viable option, right? While it certainly is, the added convenience comes at a cost otherwise known as FBA fees. This fee varies depending on the product type, category, and size. Visit this link for a complete breakdown of the FBA costs.
Aside from the FBA fees, regardless of whichever fulfillment method you select, there are other fees sellers incur such as Referral fees and long-term storage fees. We’ve come up with an excellent pricing strategy guide that will ensure your products sell at consistently high profit margins!

Note: Amazon is implementing a new fee structure that will take effect June 1, 2021.
Step 4: Begin Listing Your Products
Once your account is set up, you can start listing products on Amazon. However, there are a few things that need sorting out before you can start selling.
Amazon Store Name
Seeing as how there are hundreds of millions of sellers on Amazon, you will need to come up with a unique name for your online store. Make sure that the name and logo you create complement your offerings and fall in line with Amazon’s TOS.
Universal Product Codes (UPCs)
A Universal Product Code is a unique number assigned to each product. It helps in identifying the item as well as tracking it as it moves from the manufacturing hub all the way to the end-user. Amazon prompts sellers to provide UPCs for each item or product listed on its website. You can obtain UPCs from official sources by visiting this link.
Trademark
Despite Amazon being the leading eCommerce marketplace in the world, it has its fair share of nefarious actors. To protect your brand identity and ensure that no unauthorized sellers start selling cheap products under your name, it’s necessary to apply for a trademark. Visit the United States Patent and Trademark Office website to begin the application process.
Ownership
Amazon also asks for other details related to brand ownership (which in this case is your brand name) and manufacturer (name of the company that manufactures the product).
Step 5: Start Selling
Congratulations, you’ve successfully created an Amazon seller profile, listed your products, and are all set to start selling!
This stage marks the beginning of your seller journey. You will now have to compete against seasoned sellers in your product niche—this is where the real challenge begins.
Even with all the seller tools Amazon provides, there are still immense amounts of data that you need to take into account when calculating fees and revenue.
Fortunately for you, we have just the tool you need to make selling easy while drastically increasing your chances of success: Shopkeeper - the #1 Amazon sellers software!
How Shopkeeper Can Help You Manage Your Business With Ease
Shopkeeper is an Amazon profitability tool that focuses on calculating seller fees, profitability, and providing users with the insights needed to make the right business decisions. In a market as hyper-competitive as Amazon, sellers rely on accurate information to edge past the competition— which Shopkeeper excels at.
By choosing Shopkeeper as your seller tool of choice, you can see exactly how much profit you make.
We’ve had the pleasure of helping you this far, and we hope you enjoyed this guide on how to become an Amazon seller in the USA.
Let us help you some more by offering a free 14-day trial to any one of our subscription packages.
Have fun, and best of luck!


